Home
About Us
IT Services
Understanding IT
- Understanding General Data Protection Regulation Compliance
- Understanding Automation
- Understanding Ransomware
- Understanding Shadow IT
- Understanding Your Virtual Identity
- Understanding the Modern Office
- IT Threat Glossary
- Understanding Business Continuity
- Windows Server 2003: End of Life
- Understanding the Internet of Things
- Understanding Network Security
- Understanding SOX
- Understanding BYOD
- Understanding PCI DSS
- Windows XP End of Life
- Understanding HIPAA
- Cloud Computing
News
Blog
Support
Contact Us
(713) 979-2090
- Register
- Login
Zinc Blog
Tip of the Week: Using OneNote as a Knowledge Center
Microsoft OneNote is a very useful application, as its capabilities extend far beyond the basic note-taking that its name would imply. In fact, it has the capability to support a simple wiki-like system baked in. For this week’s tip, we’ll go over how you can use OneNote to set one up for your business’ benefit.
What’s a Wiki?
A wiki is a place on the web that allows for anyone to build content and edit what others have contributed. This content can be linked to that on other pages based on topics and keywords. For context, think Wikipedia - the name isn’t an accident.
While OneNote can’t compete with an application that is specifically meant to create these kinds of resources, it has quite a few features that make it a reasonable substitute in a pinch. Without any limitations, you can be as granular as you need to be, linking as many pages to each other as you require. Once your wiki is set up, your entire team can access it as a reference.
Setting Up Your Wiki
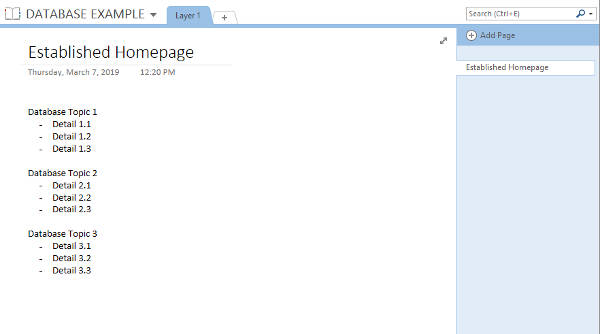
The first thing you’ll need to do is to create an established homepage that outlines the rest of your database and each topic it covers. These topics can be linked to other pages, certain paragraphs on those pages, or even entirely different notebooks. This means that you can layer your notebooks, adding to the depth of your database. For now, we’ll stick to the basic one-layer setup.
Let’s assume that your first database is going to cover three topics, each with three categories within them.
Linking Options
To simplify things, OneNote has a few options available for you to link to different parts of your wiki.
Link to Pages
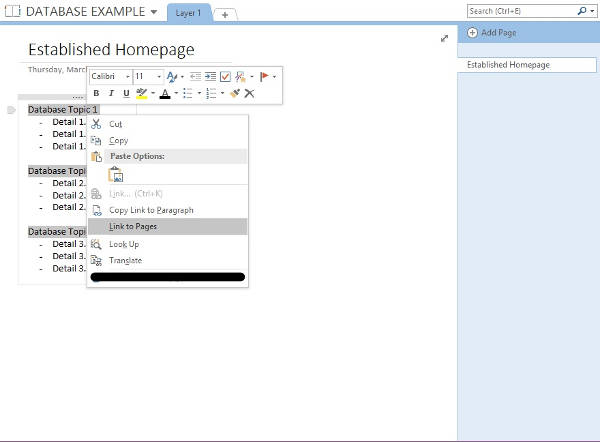
As you build your database out, there are a variety of options you can leverage to simplify this process. For instance, once you have your established homepage started, you can easily generate individual pages for each item. Highlight the text you want to use to create a new page, right click, and select Link to Pages.
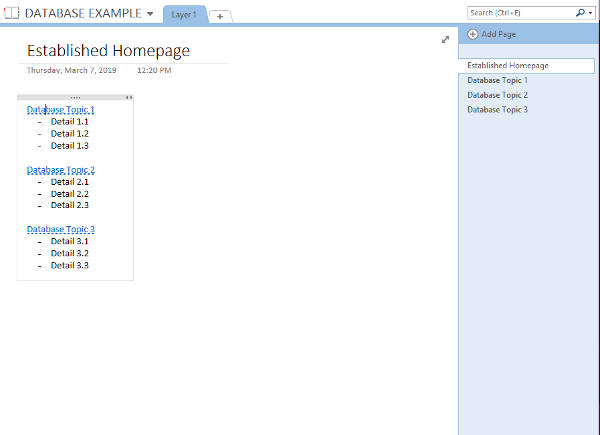
This generates a new page in your notebook for the item, linking them to the proper text on your homepage.
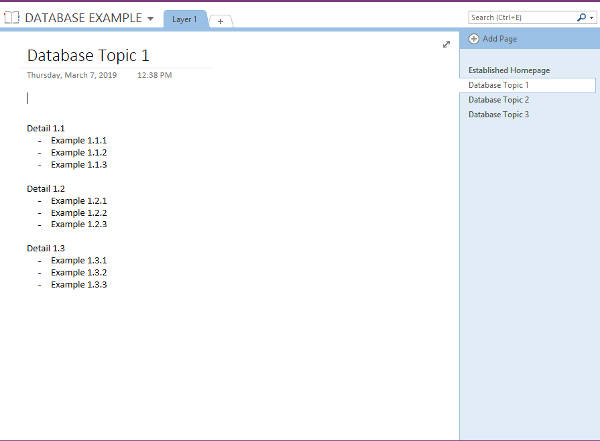
From there, you can dive deeper and continue to build pages and sections going into your topic in greater detail.
Link to Sections
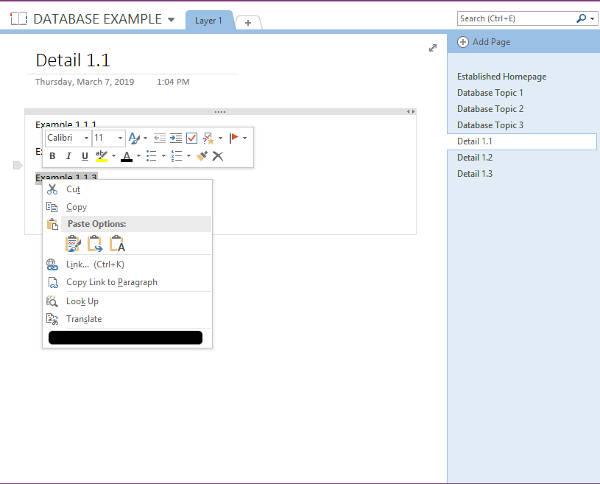
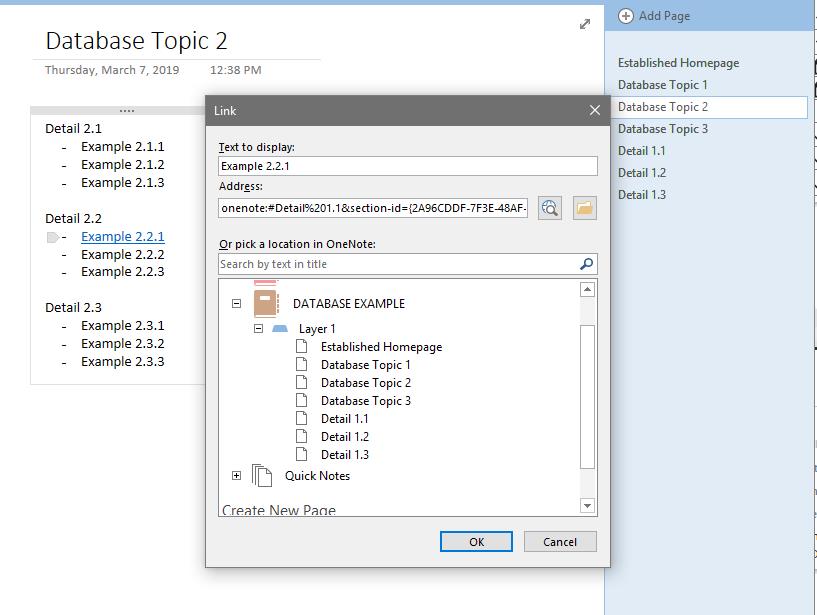
You can also add links between specific sections. To do so, you’ll first need to highlight the text you want to add the link to. Let’s assume that, in our scenario, Example 1.1.3 and Example 2.2.1 discuss related topics. You can link between these specific sections, sending anyone who decides to click on Example 2.2.1 to view Example 1.1.3.
To do so, highlight the item you want the link to direct to. You should see the option to Copy Link to Paragraph. Clicking that option will add the link to your clipboard.
From there, navigate to the place where you would like to add the link. Highlight the area, right-click, and select Link. Paste the link you copied earlier into the Address bar. If your database is still small enough, you could also pick a location to link to from that window.
Of course, you wouldn’t put all this effort into creating a database if nobody was going to use it. Furthermore, this is going to be a big project… you may want some help with it.
To invite other users to access and collaborate on your database, click File, Share, and select your chosen option. Alternatively, you can also save it to a shared area on your network, which would enable others to access it as needed.
There you have it - with some time, you’ll be able to build up a pretty effective knowledge base for your organization’s benefit.
What have you used OneNote for in the past, if for anything beyond taking notes? What other features does it have that we didn’t touch on? Leave your thoughts in the comments, and make sure to subscribe!
About the author
Zinc has been serving the Texas area since 2017, providing IT Support such as technical helpdesk support, computer support, and consulting to small and medium-sized businesses.
- You are here:
- Home /
- Blog /
- Zinc IT Team /
- Keep an Eye on Gmail’s New Capabilities


Comments